
This reflection node is a powerfull shader that supports both geometrical optics and wave optics glints, flakes, brushed patterns and scratches. Unlike in geometric optics, the contributions from different parts of the surface can sum non-linearly due to interference effects, to create the characteristic diffraction effects of wave optics.. ie. those colored patterns we see sometimes on metals, metallic paints etc.
When this happens is because the wavelength of the light is bigger than ie. the glints features so that when light strikes a glint multiple reflection waves will interfere and will destroy or add up each other causing certain wavelengths (ie. colors) to be intensified while others to be attenuated. This also creates peculiar anisotropic effects which are not possible to mimic with classic geometrical ray optics.
A general problem that this shader overcomes is that when a feature is more little than a pixel it starts to 'flicker', appearing randomly here and there.. meaning it cannot be always sampled properly, instead our glints properly 'glitter'.. ie. they act deterministically and we end up with a consistent appearance.
Despite the inner complexity, this shader node (Reflect Glints) remains easy to be used with few main parameters.

All we have to do is to select a feature from the Mode param list :
- glints
- flakes
- scratches
- brushedW
- brushedH
(custom maps will be supported in a later release).
If we have many glints nodes in a scene we may experience a micro delay while the scene is first loading or we did change the above list selection or the coverage param (we'll see later) because when these two params are changed we need to rebuild some accelleration structures.
From there we play a bit with UV Tiling until our features are the size we want them and eventually finalize the look with the coverage and smoothness parameters. To better see the glints.. low down the base roughness to 0 and keep the smoothness at 0.5 initially. Take care that while glints and flakes have no problem to work without user-defined UVs, brushed features are better approached with hand made UVs.
Generally is better we start approaching the shading with wave optics disabled because wave optics is slower, however the features modelling will be just the same speaking of spatially-varying characteristics so when eventually we'll check Use Wave Optics just expect ie. scratches to be a bit more smooth and have some nice coloring.
Below, respectively : scrathes flakes and glints rendered with ray optics.
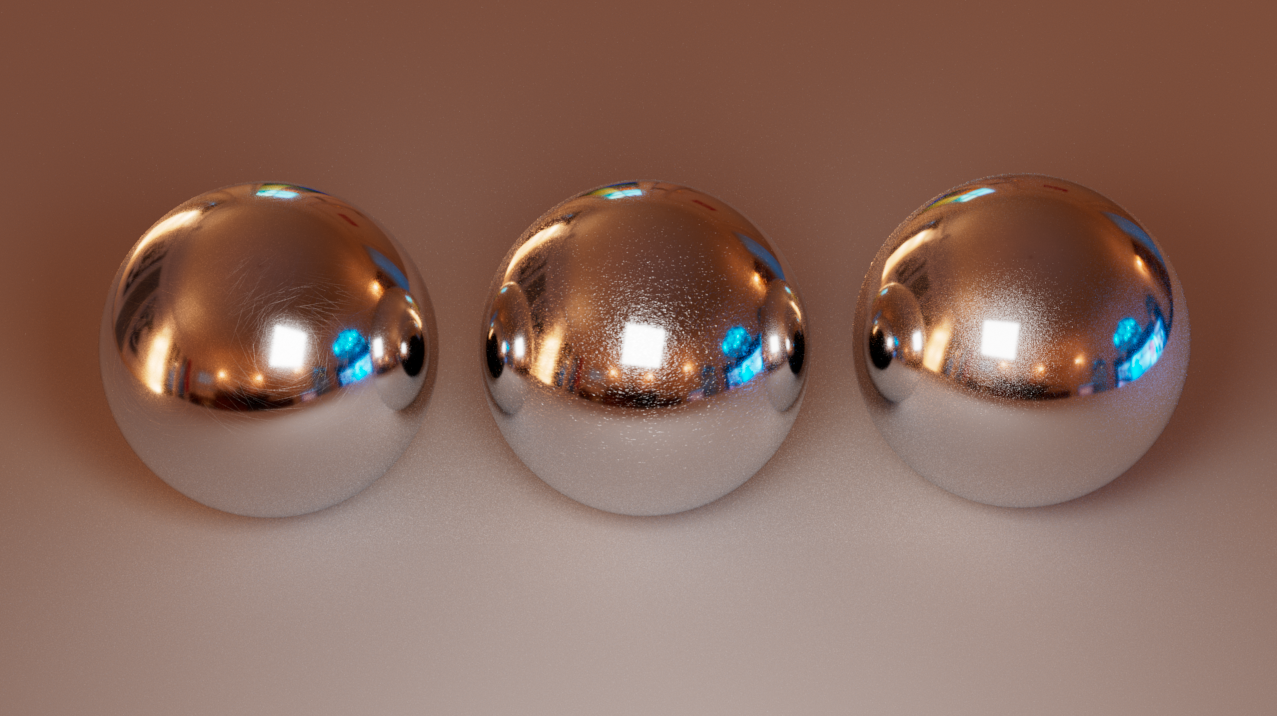
Weight Color and Roughness are the usual PBR params for reflections; with rombo nodes we get also an added Slope param which can be used to control the tail of the reflection. These four parameters control the base reflection which is independent from the glints features.. meaning we can have a rough base reflection with on top crispy scratches for example. Below only the Roughness param has changed.

We're left with just two params for the glint features, namely: Coverage and Smoothness.
First, Coverage is not texturable, we cannot attach a texture (and if we do we'll get just the first value read from there). It controls how much the glint features are extending on the surface.. ie. how much surface they actually cover. For certain appearances this might need to work together with the reflection roughness.. the more rough the reflection the more coverage so that glints will also be roughly distributed over the surface. Below a coverage of 0.5 1 and 3 respectively.

The Smoothness param does what its name is already telling us, it does smooth the features. Actually it's way more complicated than that, technically is the coherence area where the features lookup happens. And it is where you'll tweak to get features not to flicker for example. However visually it is still smoothness the main characteristic it drives. Below a smoothness of 0.1, 1 and 3. The smoother the longer the render times. Generally a valus of 1 is good. If we wanna our features approach smooth reflections at distance for example we may want to crank it up up to 10.

Render times are higher than for classic PBR reflections. However we have very nice importance sampling so it does take just a bit more computation while the sampling is granted to converge nicely without fireflies or artifacts. We can also tweak or just limit shader features when doing diffuse SDS lookups (aka caustics) and even limit the number of reflection bounces those features will be visible to, to short render times or improve convergence. While we can use this node in place of any general reflection node, due to some longer render times we better use it on 'hero objects' that really requires it. The main offender regarding render times is actually the above Smoothness param, - the higher the value, the higher the render times.


This shader can also be used to break smooth reflections and make them appear more real.. think about: we use microfacet theory to model reflection roughness in PBR materials, however those same reflections at really close inspection shouldn't appear smooth because of the micro-geometry. We can use this shader for improved realism to break in a more realistic way our reflections while being sure they won't converge to a smooth continuous appearance.
In place of using bump maps or roughness maps to make our renderings appear more real life we can use this shader to provide a more advanced solution to those kind of problems. Never occurred for example that at half render time your renderings were better looking than when rendering was fully finished ? That's because your shading was not fully converged and looked more real (ie. not ideally super smooth and continuous).
For example almost all industrial metals renderings look flat once fully converged. Here we left the glints a bit raw to better see them (ie. smoothness was kept at 0.5 while remaining params were: coverage 0.5, base roughness reflection 0.32 and slope 1.8 with UVTiling at 0.5) and look at how the light is literally trapped by those little speckles. The rendering is fully converged as we used 1K specular samples. The whole scene is lit by a strong HDR and at 1K resolution it took just 10mins to render (AMD Ryzen7).

Although we have applied them a bit randomly here, we can still use bump and roughness maps. Here even the dark glossy plastic is using the glint shader (layered with a diffuse principled node with a IOR of 1.5).. instead to use a bump map to break up the speculars we use glints while there's also a normal map for the design cuts we see on the handle etc. The brushed metal instead is using only a glint shader (set using fresnel colors for aluminum) with a roughness map to simulate some dirty usage.

This is a test with Arnold adaptive sampler to show how our glints are fully deterministic (while still being in a regime of randomness) in the sense that they are not seen as variance and effectively never converge to an unrealistic super smooth highlight. Just compare how smooth is the ring flat surface against the body side hit by direct light. That's where realism is made. Beside the diffraction proper coloration, for such little features one can't just use textures to break highlights because they would 'flicker' instead of properly 'glitter'.

Finally, here we used all PBR maps we had already like reflection roughness and normal maps for the strings keeper while we did put on top a reflection layer with flakes set to high coverage (with a value of 6.0, smoothness was 1.0) to create a spectral patina for added realism.

Keywords :
glints, wave optics, arnold, arnoldrender, arnoldrenderer, shader, material, reflect, reflection, microfacet, arnold shaders, arnold download, arnold materials, arnold renderer materials, maya, 3dsmax, houdini, katana, cinema4D, cinema, 4D, plugin, plug-in